一、说明
1.1 OpenLooKeng介绍
openLooKeng的LooKeng取自中国著名数据家华罗庚先生的英文名Loo-keng Hua。同时LooKeng的发音也与Looking相近,寓意查询分析各种数据,让大数据更简单。
openLooKeng是一种"开箱即用"的引擎,支持在任何地点(包括地理上的远程数据源)对任何数据进行原位分析。它通过SQL 2003接口提供了所有数据的全局视图。openLooKeng具有高可用性、自动伸缩、内置缓存和索引支持,为企业工作负载提供了所需的可靠性。
openLooKeng用于支持数据探索、即席查询和批处理,具有100+毫秒至分钟级的近实时时延,而无需移动数据。openLooKeng还支持层次化部署,使地理上远程的openLooKeng集群能够参与相同的查询。利用其跨区域查询计划优化能力,涉及远程数据的查询可以达到接近“本地”的性能
openLooKeng HA解决协调节点单点故障问题。用户可以在任何协调节点上提交查询,以平衡工作负载。
1.2 安装说明
安装OpenLooKeng之前,⾸先必须对整个OpenLooKeng进⾏规划,规划包括主机节点、⽹络、软件模块分布等部分。运维⼈员必须保证⽤于安装的服务器满⾜OpenLooKeng的基本要求。这些要求包括硬件要求、软件要求、内存要求、⽹络要求等,本⽂将对这些要求进⾏详细介绍。OpenLooKeng安装包括以下步骤:
1.3 适宜范围
二、安装准备
2.1 JDK版本
| Name | Version |
|---|---|
| OracleJDK | JDK1.8_244以上 |
2.2 服务器规划
安装具有HA的openLooKeng要求集群中至少有2个协调节点。请确保协调节点上的时间一致性。
| 主机 | 操作系统 | CPU | 内存 | 磁盘 | 备注 |
|---|---|---|---|---|---|
| 192.168.1.1 | Centos 7 | 8核 | 16GB | 500GB | coordinator、worker |
| 192.168.1.2 | Centos 7 | 8核 | 16GB | 500GB | coordinator、worker |
| 192.168.1.3 | Centos 7 | 8核 | 16GB | 500GB | nginx |
三、开始安装
3.1 配置高可用
3.1.1 安全环境(HDFS)
# 安装192.168.1.1的coordinator和worker
cd /opt/third
wget https://download.openlookeng.io/1.5.0/hetu-server-1.5.0.tar.gz
tar -xvzf hetu-server-1.5.0.tar.gz
ln -s hetu-server-1.5.0 hetu-server

$ cd hetu-server

# 分别创建data、etc、logs目录
mkdir data
mkdir etc
mkdir logs

vi etc/node.properties
# 输入内容:
node.environment=openlookeng
node.launcher-log-file=/opt/third/hetu-server/logs/launch.log
node.server-log-file=/opt/third/hetu-server/logs/server.log
node.data-dir=/opt/third/hetu-server/data
plugin.dir=/opt/third/hetu-server/plugin
# 动态catalog配置
catalog.config-dir=/opt/openlookeng/catalog
catalog.share.config-dir=/opt/openlookeng/catalog/share

vi etc/jvm.config
# 输入内容:
-server
-Xmx16G
-XX:-UseBiasedLocking
-XX:+UseG1GC
-XX:G1HeapRegionSize=32M
-XX:+ExplicitGCInvokesConcurrent
-XX:+ExitOnOutOfMemoryError
-XX:+UseGCOverheadLimit
-XX:+HeapDumpOnOutOfMemoryError
-XX:+ExitOnOutOfMemoryError

vi etc/config.properties
# 输入内容:
coordinator=true
node-scheduler.include-coordinator=true
http-server.http.port=8123
query.max-memory=50GB
query.max-total-memory=50GB
query.max-memory-per-node=10GB
query.max-total-memory-per-node=10GB
discovery-server.enabled=true
discovery.uri=http://192.168.1.1:8123
hetu.queryeditor-ui.allow-insecure-over-http=true
# 开启动态catalog
catalog.dynamic-enabled=true
# 高可用配置项
hetu.multiple-coordinator.enabled=true
hetu.embedded-state-store.enabled=true

vi etc/log.properties
# 输入内容:
io.prestosql=INFO

# 动态配置会检查hdfs.config.resources的目录,所以拷贝到/opt/openlookeng/config目录下
mkdir -p /opt/openlookeng/config
cp {hdfs}/core-site.xml /opt/openlookeng/config
cp {hdfs}/hdfs-site.xml /opt/openlookeng/config

mkdir etc/filesystem/
vi etc/filesystem/hdfs-config-default.properties
# 输入内容:
fs.client.type=hdfs
hdfs.config.resources=/opt/openlookeng/config/core-site.xml, /opt/openlookeng/config/hdfs-site.xml
hdfs.authentication.type=KERBEROS
fs.hdfs.impl.disable.cache=true
# 以下为安全环境kerberos认证所需配置
hdfs.krb5.conf.path=/opt/openlookeng/config/krb5.conf
hdfs.krb5.keytab.path=/opt/openlookeng/config/hdfs.headless.keytab
hdfs.krb5.principal=hdfs-emr1@HADOOP.COM

vi etc/state-store.properties
# 输入内容:
state-store.type=hazelcast
state-store.name=query
state-store.cluster=cluster1
hazelcast.discovery.mode=tcp-ip
hazelcast.discovery.port=5701
#在hazelcast.discovery.tcp-ip.seeds或者hazelcast.discovery.tcp-ip.profile配置任选其一
hazelcast.discovery.tcp-ip.seeds=192.168.1.1:5701,192.168.1.2:5701
hazelcast.discovery.tcp-ip.profile=hdfs-config-default

# HDFS上新建目录:
# 安全环境需要先进行认证:kinit -kt hdfs.keytab hdfs@HADOOP.COM
# 非安全环境直接执行创建语句
hadoop fs -mkdir -p /opt/openlookeng/catalog/share

# 本地
mkdir -p /opt/openlookeng/catalog

# 同样的方式安装配置192.168.1.2即可
3.1.2 非安全环境
将hdfs-config-default.properties文件按照以下方式修改配置项即可,其他配置同安全环境保持一致
vi {hetu-server}/etc/filesystem/hdfs-config-default.properties
# 输入内容:
fs.client.type=hdfs
hdfs.config.resources=/opt/openlookeng/config/core-site.xml, /opt/openlookeng/config/hdfs-site.xml
hdfs.authentication.type=NONE
fs.hdfs.impl.disable.cache=true
3.2 启动
./bin/launcher start
3.3 查看Web页面
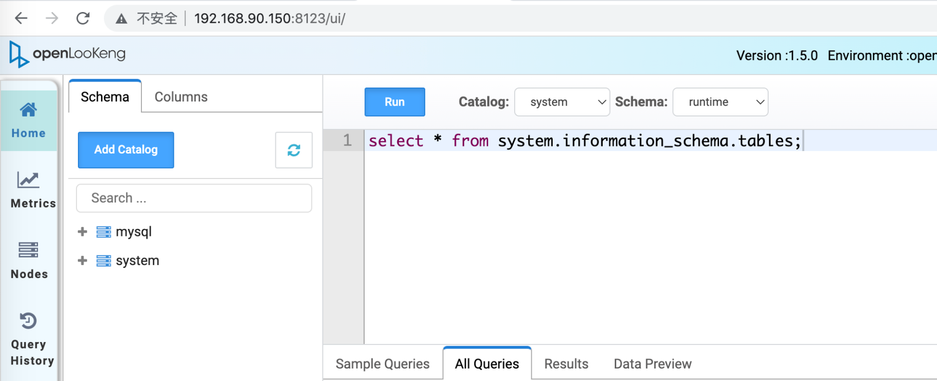
浏览器输入:http://192.168.1.1:8123/ui/或http://192.168.1.2:8123/ui/
注:登陆账号输入admin即可,登陆后点击Run运行默认语句进行验证如下:

四、动态Catalog功能验证
4.1 新增Mysql Catalog
# 方式一:http请求添加
curl --location --request POST 'http://192.168.1.1:8123/v1/catalog' \
--header 'X-Presto-User: admin' \
--form 'catalogInformation="{
        \"catalogName\" : \"mysql\",
        \"connectorName\" : \"mysql\",
        \"properties\" : {
              \"connection-url\" : \"jdbc:mysql://localhost:3306\",
              \"connection-user\" : \"root\",
              \"connection-password\" : \"root@123456\"
              }
          }
"'
# 方式二:界面点击添加(操作较简单,本文不演示)
4.1.1 查看UI界面
4.1.2 查看HDFS目录
hadoop fs -mkdir -p /opt/openlookeng/catalog/share/catalog

4.1.3 删除Mysql Catalog
curl --location --request DELETE 'http://192.168.1.1:8123/v1/catalog/mysql' --header 'X-Presto-User: admin'
4.2 新增Hive Catalog
这里直接使用postman请求,参数封装方便一些。
4.2.1 配置
- 导入示例请求到postman新增Hive Catalog.postman_collection.json
导入后可以看到两个请求示例,分别是安全环境和非安全环境下新增Hive Catalog的配置示例。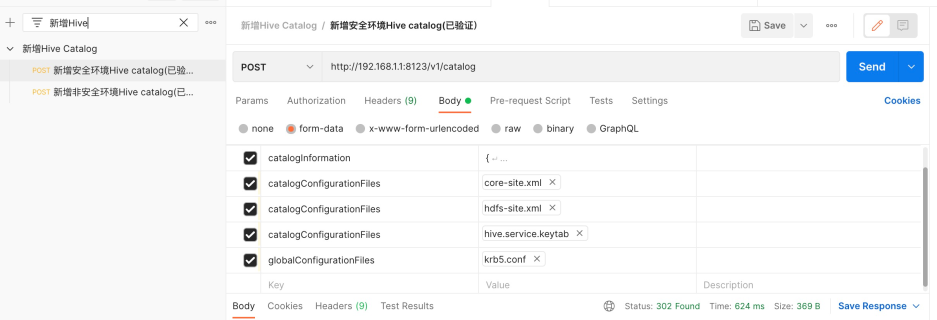
4.2.2 查看UI界面

4.2.3 查看HDFS目录

4.2.4 删除Hive Catalog
curl --location --request DELETE 'http://192.168.1.1:8123/v1/catalog/hive' --header 'X-Presto-User: admin'
五、配置HA及反向代理
5.1 安装Nginx
$ cd /opt/third
# 下载nginx-1.20.2.tar.gz
# 解压
$ tar -zxvf nginx-1.20.2.tar.gz
$ ln -s nginx-1.20.2 nginx
$ cd nginx
$ ./configure --prefix=/opt/third/nginx --with-stream
$ make && make install

# 创建日志目录及文件
$ mkdir logs
$ touch logs/access.log
$ touch logs/error.log

# 启动验证nginx安装是否成功
$ ./sbin/nginx
5.2 配置Nginx反向代理
# 修改Nginx配置文件
$ vi conf/nginx.conf
# 在http同级添加以下配置即可

stream {

    upstream olks{
        server 192.168.1.1:8123;
        server 192.168.1.2:8123;
    }

    server {
        listen 8123;
        proxy_timeout 600s;
        proxy_connect_timeout 20s;
        proxy_pass olks;
    }
}
如图: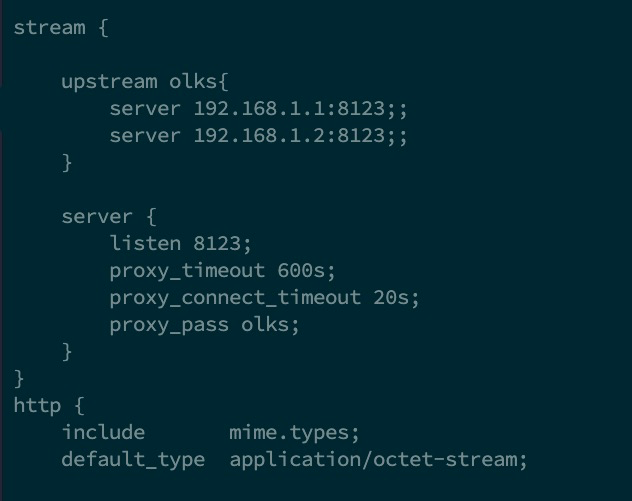
- 重启Nginx
./sbin/nginx -s reload
5.3 验证
浏览器输入:http://192.168.1.3:8124/ui/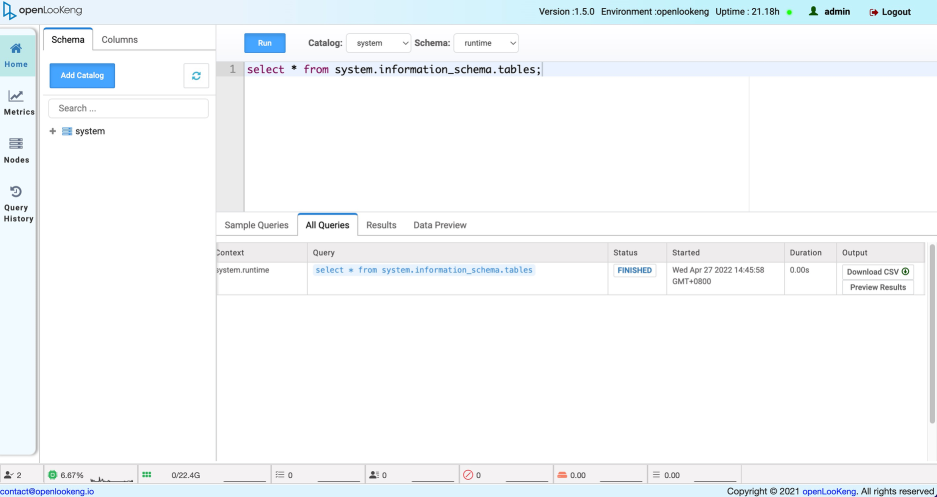
六、配置安全认证
开启https和jwt认证后,openLooKeng的UI界面就无法使用了,所以需要结合openLooKeng客户端来查看内部数据。具体操作如下:
$ cd /opt/third/hetu-server/bin
# 使用openLooKeng客户端命令进入命令行
$ ./hetu-cli --server localhost:9090 --debug  --catalog  hive  --schema test
6.1 Https
# 进入hetu-server安装目录
$ cd /opt/third/hetu-server

$ vi etc/config.properties
# 添加以下内容
# 密钥配置项
http-server.https.enabled=true
http-server.https.port=8123
http-server.https.keystore.path=/opt/third/hetu-server/etc/https/keystore.jks
http-server.https.keystore.key=123456
# 修改为false
hetu.queryeditor-ui.allow-insecure-over-http=false
# 修改为https
discovery.uri=https://192.168.1.1:8123
# 删除 http-server.http.port=8123
http-server.http.port=8123

$ mkdir etc/https
$ cd etc/https

# 执行生成keystore,执行成功后会生成keystore.jks,ip修改为Nginx主机
$ keytool -genkeypair -alias presto_keystore -validity 3650 -keyalg RSA -dname "CN=192.168.1.3,OU=Unknown,O=Unknown,L=Unknown,S=Unknown,C=Unknown " -ext SAN=IP:192.168.1.3 -keypass 123456 -keystore keystore.jks -storepass 123456 -storetype JKS
6.2 JWT
# 进入hetu-server安装目录
$ cd /opt/third/hetu-server

$ vi etc/config.properties
# 添加以下内容
# jwt认证
http-server.authentication.type=JWT
http.authentication.jwt.key-file=/opt/third/hetu-server/etc/jwt/${KID}.key

$ mkdir etc/jwt
$ cd etc/jwt
$ vi qing.key
# 将金蝶方生成的sk添加到qing.key中即可,如:KiTQFUyQV7pgHAB4AFn4RQ==
6.3 配置网关认证
# 进入hetu-server安装目录
$ cd /opt/third/hetu-server

$ mkdir etc/auth
$ vi etc/kingdee.properties
# 添加以下配置

# 数栖网关地址
gataway.server.addr=http://192.168.1.5:8886
# 轻分析服务地址
kingdee.server.addr=http://192.168.1.6:8778

# 租户与用户映射地址
mapping.addr=/api/uac/current/mapping
# catalog权限校验地址
catalog.auth.addr=/connector/check

# 网关ak
access.key=dOrCa0oHzK2DWBJR
# 网关sk
secure.key=YEfdIreTWvNEabcii2LSbORJ0vYIbw==
七、参考
【1】官方部署文档:https://openlookeng.io/zh-cn/docs/docs/installation/deployment-ha.html
